Unity本地化应用名
做本地化的时候,一方面我们要完成游戏内的文本多语言,另一个不可忽略的细节是App名字的本地化。就前者而言,Unity的Asset Store里有一个很好用的插件I2 Localization;但后者在网上的相关资料不多。下面就分享一下具体在Android和iOS下分别如何本地化应用名。
Android
安卓部分比较简单,在AndroidManifest.xml(不管是Unity自动生成的或者是项目里手写的)中:
<application android:icon="@drawable/app_icon" android:label="@string/app_name" android:theme="@android:style/Theme.NoTitleBar.Fullscreen" android:debuggable="false" android:isGame="true" android:banner="@drawable/app_banner" android:name="com.soomla.SoomlaApp"> |
通过指定**@string/app_name**作为应用名。所以只要在多语言版本的资源中指定对应名字即可。
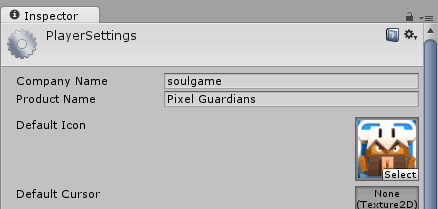
需要注意的一点是,默认的名字会以Player Setting里的Product Name为准
对于其他语言,譬如简体中文,就在如下目录建立对应的strings.xml,内容为
|
放在Assets/Plugins/Android/res/values-zh-rCN/strings.xml中。对于其他语言类似处理,如台湾Assets/Plugins/Android/res/values-zh-rTW/strings.xml、香港Assets/Plugins/Android/res/values-zh-rHK/strings.xml。
注:直接在Assets/Plugins里放Android res的方法在Unity 5里已被标注为废弃,官方建议用aar的形式,不过我就先偷懒了…
iOS
苹果会麻烦一些,如果要做本地化的话需要修改两个地方
- 修改Info.plist,标准存在本地化的应用名
- 增加一个多语言版本的InfoPlist.strings,放翻译过的名字
我是基于喵神的XUPorter自己实现的:
Dictionary<string, object> dict = (Dictionary<string, object>)PlistCS.Plist.readPlist(plistPath); |
大体思路就是为了解决上面提到的两个地方:修改Info.plist;直接将名字写入不同语言的翻译文件中,如zh-Hans.lproj/InfoPlist.strings的内容就是:
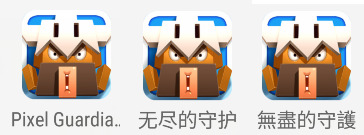
"CFBundleDisplayName" = "无尽的守护"; |
最麻烦的地方在于将这些InfoPlist.strings加入到工程中去,为此还好好研究了下xcodeproj的文件结构:首先将不同版本的翻译文件加入到一个PBXVariant,其次将这个PBXVariant加入到工程目录,最后在build target的PBXResourcesBuildPhase里挂上…
以上就完成了在不同系统语言下显示不同的应用名字,而且这些可以利用脚本自动化完成,只需要修改配置信息即可在出包时自动刷新~